attacks <- read.csv("../data/attacksUK.csv")Setup: RStudio in your Browser
In this module you use RStudio in your web browser. You don’t need to install anything. R, RStudio and all the course files are ready for you.
This works on any computer: university PCs, Windows laptops, Macs and Chromebooks.
It runs on GitHub Codespaces. A codespace is your own computer on the internet. Only you can use it, and it keeps your files between sessions.
1. First time only
Step 1. Make a GitHub account.
Go to github.com/signup and create a free account. You can use your university email. Then sign in.
Step 2. Create your codespace.
Click this button, then click the green Create codespace button:

Wait while your codespace is built. The first time this takes several minutes, because R, RStudio and the course packages are installed for you. Don’t close the tab. (Next time it opens much faster.)
When it’s ready, a blue and grey window opens in your browser. This is called VS Code. You don’t need to use it, but keep it open in the background.
Step 3. Open RStudio.
When everything is ready, you have two ways to open RStudio:
- A small message appears in the bottom-right corner. Click Open in Browser.
- Or look at the panel at the bottom of the window. Find the box that says RStudio is ready. Hold Ctrl (Cmd on a Mac) and click the link in the box.
RStudio opens in a new tab.
Tip
The new tab is stuck on a GitHub page that says “authenticating”? This is normal. Try these in order:
- Press F5 to refresh the page.
- Wait a minute: RStudio may still be starting. Then refresh again.
- Use a normal browser window, not a private or incognito one. Chrome or Edge work best. Some browsers (Safari, Brave, or Firefox/Edge with strict tracking protection) block the cookie GitHub needs to sign you in: allow cookies for
github.devor switch browser. - In the VS Code window, click the Ports tab in the bottom panel, right-click the RStudio row (port 8787) and choose Open in Browser.
Step 4. Bookmark the RStudio tab.
This is your personal RStudio address. Use it to come back quickly next time.
2. Every time you work
- Go to github.com/codespaces and click your codespace. You can also click the button in Step 2 again: it takes you back to the codespace you already have.
- Open RStudio with your bookmark, or as in Step 3.
- Work in the RStudio tab.
- When you finish, go back to github.com/codespaces. Click the … next to your codespace and choose Stop codespace. This saves your free hours. Your files are not deleted. If you forget, it stops by itself after about an hour without using RStudio.
3. Your files
In RStudio, the Files panel (bottom right) shows the course folder:
stats/
├── data/    the datasets
├── img/     pictures used in the labs
├── labs/    one lab file for each week
└── myLabs/  your own copies of the labs: you work here
Everything is already in the right place. You don’t need to download, move or set up anything.
The labs folder updates automatically each time you open your codespace, so you always have the latest version of the labs. Don’t work in the files in labs: if you change one, the whole labs folder can stop updating. Work on your own copy in myLabs instead (see below). Nothing in myLabs is ever changed or replaced.
4. Your first lab (Week 1)
- In the Files panel, click
labs, then click00.introR.qmd. The lab opens in the top-left panel. It shows you around RStudio and how to run code. - Make your own copy. Click
File -> Save As..., go to themyLabsfolder, and click Save. The copy is now open in RStudio: work in this one. - Then open
01.DataExploration.qmdfromlabsand copy it tomyLabsin the same way. This is the main practical for Week 1. - Go through each lab from top to bottom and run each code chunk. Write your notes and answers in the white space between the chunks.
- Save often: press Ctrl+S (Cmd+S on a Mac).
Each week, open that week’s lab from labs, save a copy in myLabs, and work on the copy. Next time, open your copy straight from myLabs.
Your changes are only saved in your own codespace. They don’t change the website, and other students can’t see them.
Note
How the labs find the data
The lab code loads data like this:
../ means “go up one folder”. Your copy of the lab is in myLabs, so R goes up to stats and then into data. You don’t need to change these lines.
5. Adding data from Canvas
Some datasets are only on Canvas, for example the Family Resource Survey (FRS). To add one:
- Download the file from Canvas to your computer.
- In RStudio’s Files panel, click
data. - If the lab asks for a new folder (for example
FRS), click New Folder, type the name, and click OK. Then click the new folder to open it. - Click Upload, then Choose File. Pick the file you downloaded and click OK.
Now the lab code will find the file.
Big files: drag and drop in VS Code
RStudio’s Upload button can fail with big files. If it does, use the VS Code window instead. This is the blue and grey window from Step 2 of section 1. If you closed it, open your codespace again from github.com/codespaces.
- Download the file from Canvas to your computer.
- In the VS Code window, find the Explorer panel on the left. Open the
datafolder (the red box below). - Drag the file from your computer (for example from your Downloads folder) and drop it on the
datafolder. If the lab needs a subfolder (for exampleFRS), right-clickdata, choose New Folder, type the name, and drop the file on that folder. - Wait until the file appears in the list.
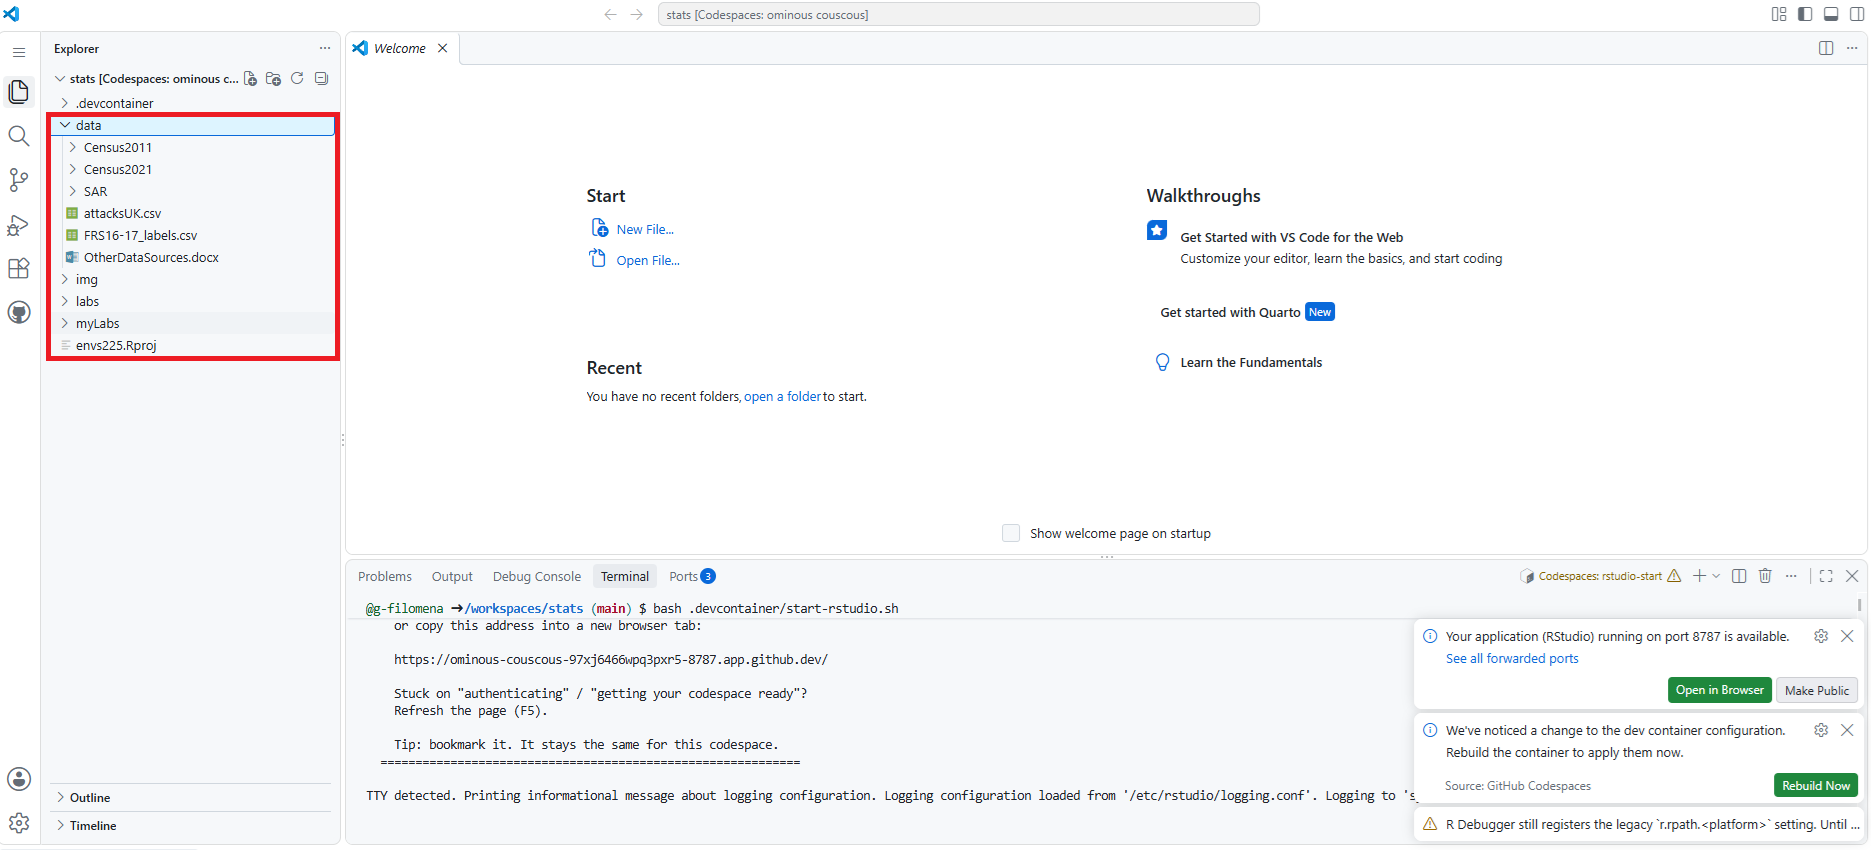
data folder.Go back to the RStudio tab. The file is now in the Files panel under data. If you don’t see it, click the refresh button in that panel.
You can use the same method for any other file from Canvas, such as the report template: drop it on myLabs instead of data.
Warning
Some datasets are licensed. Data such as the FRS is only for students on this module. Use it for your coursework only. Don’t share it or put it on GitHub or any other public website.
Important
A codespace is not a safe place to store your only copy of a file. It can stop, lose its connection, or be deleted (see the warning in section 6). Keep the original files from Canvas on your computer, so you can add them again if you need to start a new codespace. Files you add yourself are not part of the course folder, so a new codespace will not have them.
6. Saving a copy on your computer
To download a file from RStudio (for example to keep a copy, or to submit your work):
- In the Files panel, tick the box next to the file.
- Click More, then Export…, then Download.
For the assessment, download the report template from Canvas and upload it to your myLabs folder (the same way as in section 5). Write your report there. You submit an .html file, which you make with the Render button at the top of your file. See How to submit.
Warning
Keep copies of your work. If you don’t open your codespace for 30 days, GitHub deletes it, and your files are deleted too. Download your files from myLabs from time to time, and always before holidays and before the assessment deadline.
7. If something goes wrong
- RStudio is stuck on “authenticating”. Press F5 to refresh the page. If that doesn’t help, see the tips in Step 3 of section 1.
- RStudio says it lost the connection. First press F5 to refresh the RStudio tab: often the connection just dropped for a moment, and your work is still there. If that doesn’t help, your codespace has stopped. Open it again from github.com/codespaces, then refresh the RStudio tab.
- You don’t see the
myLabsfolder. Your codespace was created before we added it. In the VS Code window, click in the panel at the bottom, typegit pulland press Enter. Then stop your codespace and open it again (see section 2). - R says it can’t find a file. Check that the file is really in the folder named in the code. You can see this in the Files panel.
- GitHub says you have no free hours left. The free plan gives you about 60 hours a month. Always stop your codespace when you finish (see section 2). If you run out, use RStudio on a university PC (see Setup: RStudio on a PC or Laptop).
Another option: RStudio on a university PC or your own laptop
You can also work in RStudio installed on a university PC or on your own laptop. See Setup: RStudio on a PC or Laptop.